Sunday, 24 September 2023

Vendor Aging Report with Large Data Volume in Microsoft D365 F&SC

 Introduction

There is a thrilling announcement that Microsoft has launched a new functionality for Vendor Aging reports having large data volume in July 2023, now customers will get rid of session time out.
The vendor aging report can time out due to large data volume. This feature provides an alternative way to let customers export results from the vendor aging report. Customers will be able to do reporting based on the exported data, and this assures business continuity.

Problem Statement

Many times businesses face issues of time out in Microsoft D365 F&SC while running Vendor aging reports with large volumes of data. This causes a problem in business continuity and business loss since the customer is not able to fetch the report and is unable to track the Vendor aging and make payment timely.

Feature Details

When you run the vendor aging data storage process to export the vendor aging report, the results can go to an external system using our data management framework. This feature provides an efficient way to report on data when there are large volumes of it.


Configuration and Process

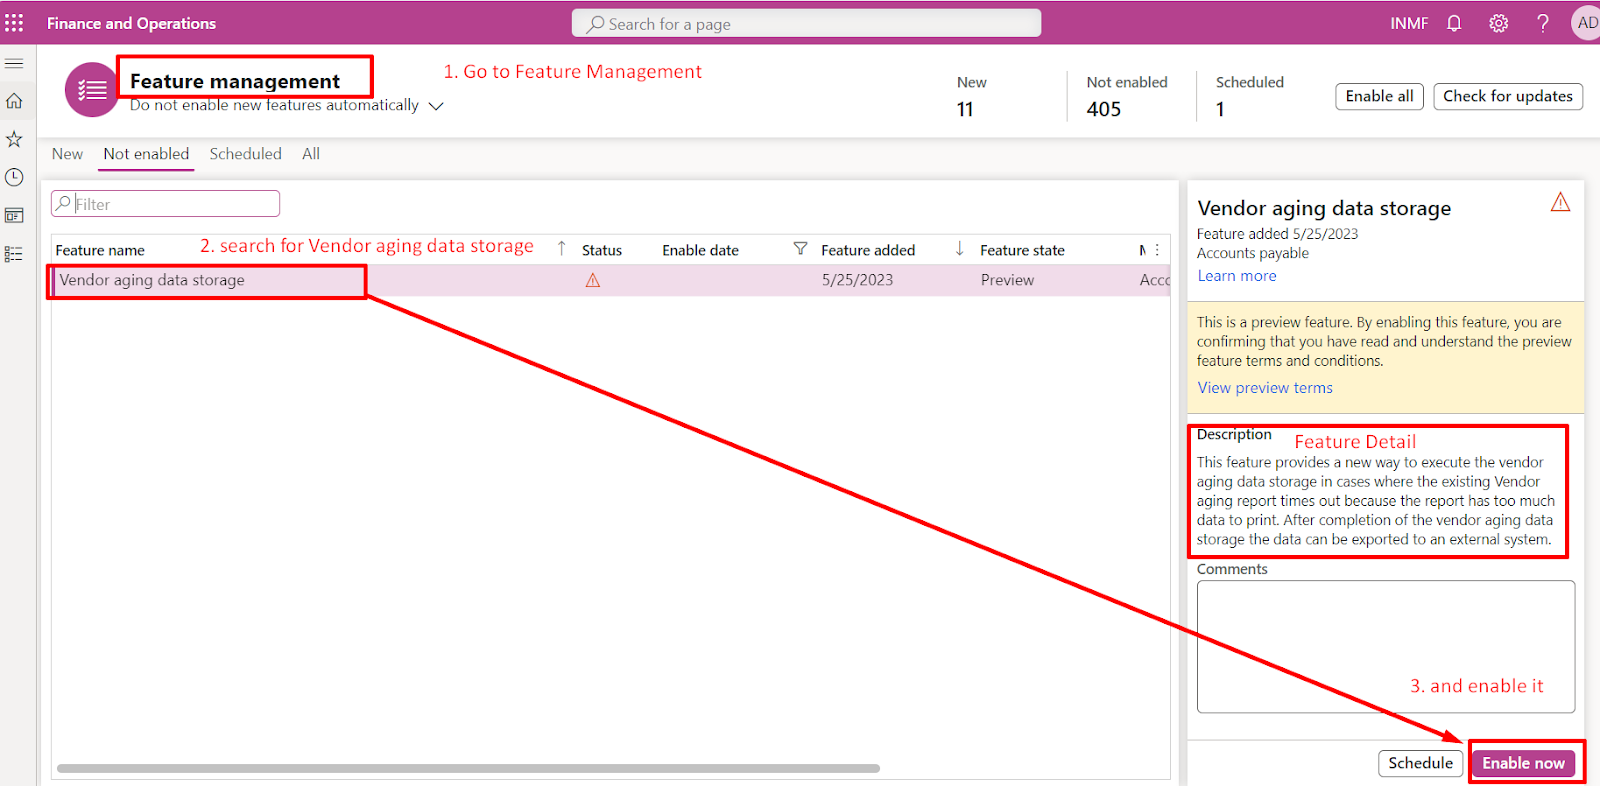
1. Enable the vendor aging data storage feature

        In the Feature management workspace, enable the Vendor aging data storage feature:


2. Run the vendor aging data storage process


        (A)  Go to Accounts payable > Inquiries and reports > Vendor aging data storage.
    

       (B)  then click on new and in the name provide process name and fill other parameters as required
and Click OK to run the batch job.


Note: Transaction details are always included, and the processing is always done in a batch job.

        (C)  After Clicking OK, batch job will run


        (D)  Refresh the Vendor aging data storage page to see the batch name, batch runtime, and processing status. When the batch job is completed, the Processing status field is set to Ended, and the Number of aging lines field is set. If the batch job is recurring, the Processing status field is set to Waiting.
Record the Execution name which is batch name as per below screenshot. It will be used as a filter while extracting vendor aging reports from Data Management Framework.
In our case it is "All vendor aging-2023-09-23T18:57:21"


3. Use of Data Management Framework for exporting the Vendor Aging

        (A) Go to Data Management > click on Export

        (B) Apply filter for which batch job (execution name) aging report will be generated

        (C) Now Click EXPORT to generate the Aging report

        (D) Batch job will run and 
Number of aging lines (in our case it was 97 same as at the time of creating Vendor aging data storage in Accounts payable module) will be generated

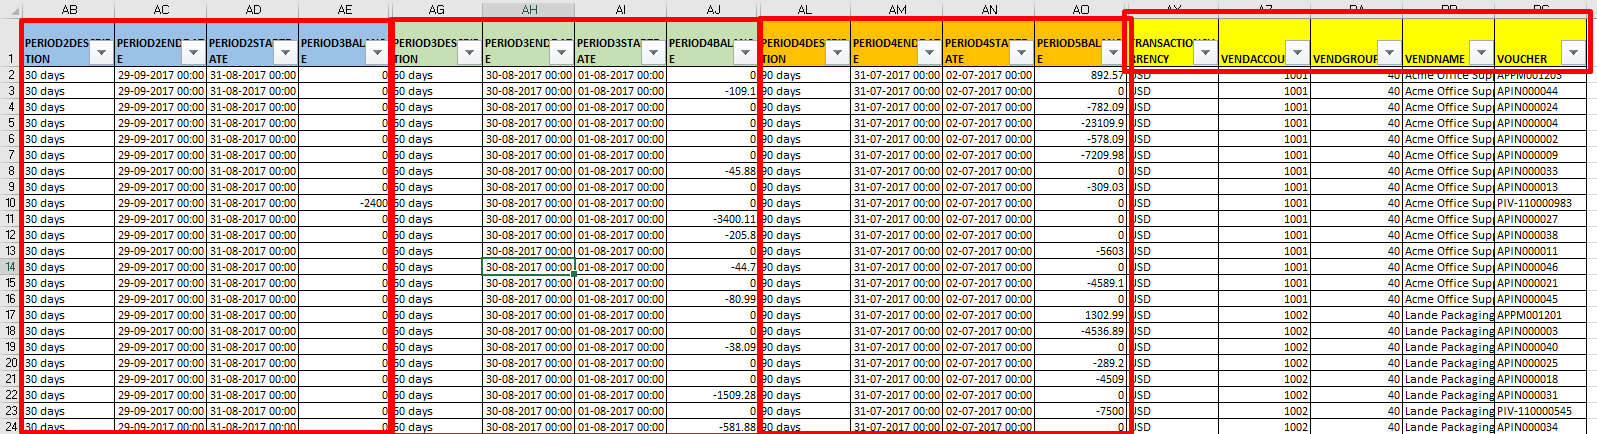
        (E) Report will be downloaded and can be shared or used for business purpose.
                     As per below screenshot Vendor Aging will be downloaded based on aging period definition of 30 day, 60 days and 90 days and yellow highlighted is related to vendor information.


Important Note

If "Vendor aging data storage" entity is not visible then
        Go to Data management > Framework parameter > Entity Setting > Refresh entity List, it will update/refresh all the entity in the system.


Thank you
Happy Learning 🙂


Monday, 14 August 2023

Collections coordinator workspace in Microsoft Dynamics 365 F&SC


Collections coordinator workspace

Business Requirement:

When a collections agent views a customer record, a lot of information is needed from credit ratings, payment history, and communication history. This process can take anywhere from 15-30 minutes to search and find in Dynamics 365 Finance. With the new workspace page, the collections agent will have a summary of past activities and the most relevant information in one place. Personalized emails can save them even more time when sending reminder letters to customers.

Solution:

1. Enable the Collections coordinator workspace

A.    Go to the feature management and enable the (Preview) Collection Coordinator Workspace


2. Explore the Collections coordinator workspace

A.    Now go to Credit and collection module and click on Collection Coordinator (Prieview)


B.    Overview of Collection coordinator workspace


  • Open contracts – The number of active project contracts from the Project management and accounting module.
  • Open invoices – The total number of invoices that haven't been fully settled.
  • Months as a customer – The number of months that the customer has been a customer. The value is calculated from the Customer since field on the Credit and collections tab of the customer record.
  • Credit limit – The customer's credit limit.
  • Credit remaining – The customer's remaining credit amount. The value is calculated during the Age customer balances periodic process.
  • Account status – The account status. The value is taken from the Account status field on the Credit and collections tab of the customer record.

C.    Customer Timeline and Contact Details

Customer Timeline: The Customer timeline section shows posted invoices, payments that have been received, collection letters that have been sent, and activities
Contact Details: To quickly contact a customer, use the Contact details information at the bottom of the page. The Collections contact value is taken from the Credit and collections tab of the customer record and is the first contact for the customer when contacts are viewed

D.    Action on  Customer Open Transaction from the workspace

The Open transactions tab shows the customer transactions that haven't been fully settled. Collections options on this page include Change statusNSF paymentWrite-offSettleReprint, and View collections history 


Happy Learning
Thank You :) 


Wednesday, 26 July 2023

GST Based on Slab Value in D365 Finance & Operations: Complete end-to-end Setup and process

 Business Requirement

Requirement In short: When GST is computed on the basis of threshold limit with the same HSN.

In the clothing and apparel industry, GST levied on clothes depends on the cost of your purchased clothes. GST of 5% will be levied on readymade garments whose price doesn’t exceed ₹1000 and GST of 12% will be applicable on readymade garments whose price exceeds ₹1000.

HSN Code

Description

Rate (%)

6101

MEN'S OR BOYS OVERCOATS, CARCOATS, CAPES, CLOAKS, ANORAKS (INCLUDING SKIJACKETS), WIND-CHEATERS, WINDJACKETS AND SIMILAR ARTICLES, KNITTED OR CROCHETED, OTHER THAN THOSE OF HEADING 6103

5%

6101

MEN'S OR BOYS OVERCOATS, CARCOATS, CAPES, CLOAKS, ANORAKS (INCLUDING SKIJACKETS), WIND-CHEATERS, WINDJACKETS AND SIMILAR ARTICLES, KNITTED OR CROCHETED, OTHER THAN THOSE OF HEADING 6103

12%

So here, GST is levied on the basis of Slab Value with the same HSN.

This blog will explain the Setup and functionality of Dynamics 365 Finance & Operations of using a threshold value for GST computation and any similar scenarios.


Required Setup:

1. Go to Electronic Reporting and create a new Configuration provider and select tax configuration to create a new GST extension


2. Click on Tax (India GST) which is Standard of Microsoft then click on create new Configuration.

Note: we need to create new configuration provider and then the proposed changes will be done in created GST extension because we cannot make changes in standard Tax (India GST).   


3. then click on Designer to add a new column in GST rate. 


4. Expend GST and its all three components select rate and add a new required column for our scenario i.e Assessable Value.


5.  Select a new column "Assessable value" as a column in the Rate 


6. Save selected assessable value, two column will be added: 
a.  Assessable value min 
b.  Assessable value max

Note: Repeat this activity for all GST component i.e. CGST, SGST and IGST


7.  Change the status to complete after giving a description


8.  Now go to the TAX Module and click on Tax Setup


9. Go to Configuration to choose the updated GST version.


10. Select new Changed GST Extension and its updated version. Synchronise it with previous GST version to sync all previous GST setup with current version and Set it to activate


11. Activate the GST for Company and Go to setup to define the assessable value


12. Define the value in the Assessable Value max and min column fields as per our scenario.


Note: Now the setup is complete and you can create a sales order and check the GST computation as per the scenario.

Scenario Process Entry:

1A. Create new Sales Order and select relevant GST details in the Tax Information menu


1B. GST is calculated at 12% since Sales Order is of the amount of 2000 which lies in the second slab having a GST rate of 12%.


2A. Create new Sales Order and select relevant GST details in Tax Information menu


2B. GST is calculated at 5% since Sales Order is of the amount 1000 which lies in the first slab having a GST rate of 5%.


Thank you 
Happy Learning :)


Sunday, 4 June 2023

Tax Configuration Setup in D365 Finance & Operations

Requirement

In the previous blog where we learned how to Import Tax (India GST) from Electronic Reporting. After Importing the Tax (India GST) from Electronic Reporting it is required to do the Tax setup in the Tax module of D365 Finance & Operations as we can see in the below screenshot it is blank. 

To do the complete setup of GST for any legal entity we need to create a Tax setup where the tax rate is defined. So in this blog, we will see how to create a Tax setup, a complete tax rate setup is not covered under this blog.


Configuration Step

1. Go to Tax > Setup > Tax Configuration > Tax Setup.


Click on NEW to create GST setup


After clicking on the save Configuration button got enabled, After this click on NEW under the Companies Fast Tab to add the company for which tax configuration is to be done.

Select the Company and then click on Configuration


2. Tax Setup > Configuration > Tax Configuration

Select the Tax version that has been imported from electronic reporting and that the organization need to activate. 


3. Click Synchronize to sync the selected version of Tax


Dialogue box will Open, Now Click OK


4. After Synchronization Activate button will be enable, to activate the recent version click on Activate    


5. Go to Setup to select the tax type mapping (In our case it is GST)


Addition Information:

1. After Activate Deactivate button will be enabled and NAME and VERSION information will be updated in the field


2. Click on setup to do the Tax rate setup component wise and other information like GST registration number, posting type main account mapping etc.


Thank You!

Happy Learning Slight smile

Saturday, 27 May 2023

Tax engine import configuration in D365 Finance & Operations

 Business Requirement

To configure the GST Setup for Indian Legal entity in new Sandbox Environment where there is blank in Tax configuration under Electronic Reporting workspace. 


Note: The Tax engine functionality is only available for legal entities with a primary address in India.


Configuration Process

1. Create new Repository for company


2. Click new to create new configuration provider


3. To Make the created configuration provider active click on set active


4. Click on Repository to create Lifecycle Services (LCS) Configuration Repository


5. Create Repository and then click on the link to login with environment credential and give access to LCS


6. Authorisation is successful close this success popup and click OK on the previous tab (in above screenshot).

Then Select the project Type and click OK


7. Configuration Repository is created


8. Go to Microsoft Repository to import INDIA tax GST


9. Go to Global Configuration repository and OPEN


10. Click on the link to login with environment credential and give access to D365 FO


11. Authorisation is successful close this success popup and click OK on the previous tab.


12. Now, Configuration repository is Open. Here search for Tax India GST and select the recent version of GST and click on IMPORT


13. Click on Tax Configuration to see the Imported GST version


14. India GST Configuration is imported successfully 

NOTE: Now this imported version can be used in D365 Finance and Operation to do Tax setup under Tax Module.

How to do tax setup in D365 Finance & Operations will be shown in next Blog.


Thank You!

Happy Learning Slight smile

Featured post

Vendor Aging Report with Large Data Volume in Microsoft D365 F&SC

 Introduction There is a thrilling announcement that Microsoft has launched a new functionality for Vendor Aging reports having large data v...