Thursday, 27 April 2023

Asset Leasing General Introduction in Dynamics 365 Finance & Operation Part 1

 Introduction

Asset leasing is an advanced capability for managing, tracking, and automating financial transactions for leased assets in Microsoft Dynamics 365 Finance. Asset leasing complies with International accounting standards (IFRS 16) and US GAAP standards (ASC 842).

Lease agreement - The lessor (who owns the asset and provide asset on lease/rent to the lessee) owns the asset and agrees with the lessee (who take asset on lease from lessor) to lease an asset for specific period in exchange for periodic lease payments.

Note: Accounting in D365 Finance will be done on behalf of lessee.


Concept of Asset Leasing


Note: Defined Value (in above image) for Short term lease / low value lease is defined on Lease books as a threshold. Below is the image from D365 Finance & Operation where these value is defined.

Accounting for this -  deferred rent treatment is applied (expensed off like a rent) - Income Statement treatment no impact on Balance Sheet


Accounting Entries


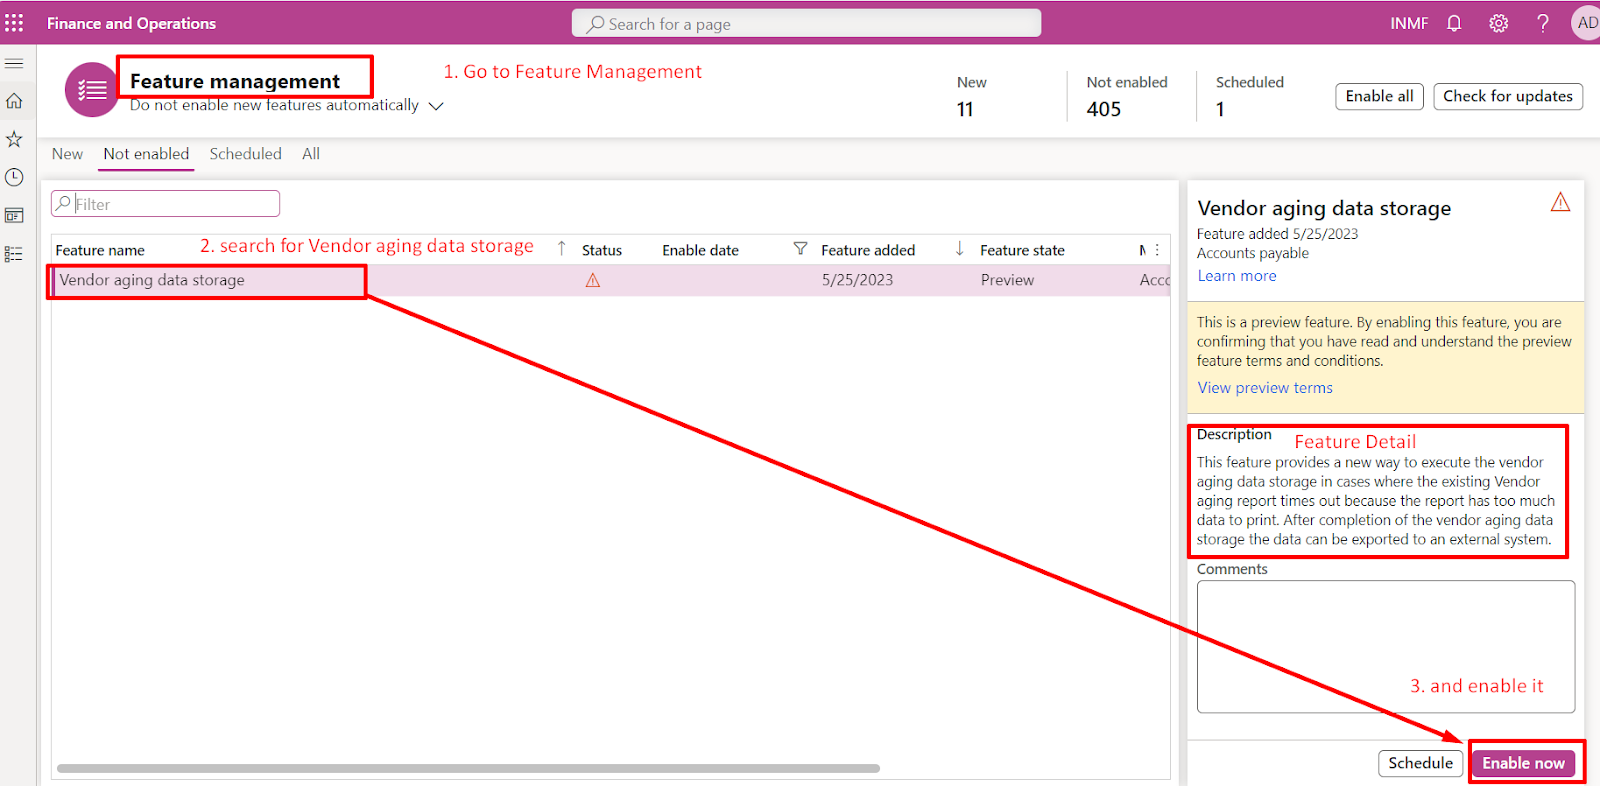
How to enable Asset Leasing Module:

First go to feature management from workspace and then search for Asset Leasing in all and Finally Enable it from Enable Now button in below extream right. After this refresh the browser URL, Asset Leasing Module will be visible in Module Section.


NOTE: We will learn basic configuration of Asset Leasing Module in the Part 2 of the blog.


Thank you Slight smile

Happy Learning

Wednesday, 26 April 2023

TDS Calculation for a Scenario of Per Transaction wise and Cumulative as well in D365 F&O

 Business Scenario

  • AS per Indian Income Tax Act 1961, Section 194C, If payment to the contractor exceeds Rs. 30000, then TDS would be deducted. This limit is per invoice basis. 
  • However, if the aggregate of amount paid to the contractor exceeds Rs. 100000, then TDS would be deducted from the whole amount that was non-taxed in the previous transaction.


Invoice NoInvoice AmountTDS@2%
Inv-01                35,000700
Inv-02                22,000N.A.
Inv-03                25,000N.A.
Inv-04                21,0001,360
 Total             1,03,000 

Here, TDS 1360 is calculated on previously non-taxed transactions i.e. (22000+25000+21000) @ 2% = 1360. TDS is calculated because the aggregate of all four invoices is exceeding the threshold limit of 100000.


Configuration

1. Click new to create a new withholding tax component group


2. Create withholding tax components


3. Create a threshold definition

Note: mandatorily Make final level yes to the last threshold range like for cumulative 100000 - max and per transaction 30000 - max 


4. create withholding tax codes


5. create withholding tax groups


6. Go to withholding tax codes and enable threshold hierarchy


Setup of threshold designer as per scenario:


7 Map TDS group to vendor master and fill in PAN number


Result

Invoice NoInvoice AmountTDS@2%Remarks
Inv-1                 35,000700Created Invoice journal and posted for Vendor Vendor1, TDS calculated of INR 700
Inv-2                 22,000N.A.Created Invoice journal and posted for Vendor Vendor1, No TDS calculated
Inv-3                 25,000N.A.Created Invoice journal and posted for Vendor Vendor1, No TDS calculated
Inv-4                 21,0001,360Created Invoice journal for Vendor Vendor1 and tax is correctly calculated on (22000+25000+21000) @2% i.e. 1360
 Total              1,03,000  

Note: previous 3 transactions should be posted only then in 4th transaction TDS calculation will happen on the non-taxed invoice


Happy Learning!

Thank You Slight smile

Tuesday, 25 April 2023

Configuration of Delegate and Expense Report Policy of Expense Management in D365 F&O Part 2


Overview

In this blog we will discuss about the configuration of delegation of work and expense report Policy.


1. Delegate an Expense Report

Occasionally, an approver might need to delegate their tasks to another user. Potential reasons for delegating tasks could be that the approver will be on vacation and needs to set up a delegate for a period of time, or when another approver has more knowledge of the expense report details and a one-time delegation is needed

Whatever the situation, the delegated approver must have the applicable security rights to approve the expense

Configuration

Step 1: Go to delegate in Expense management Module


Step 2: Select employee whom expense is to be delegated (Note: Make sure there is employee created for the user in the D365 F&O)


then Select delegate's user ID


Finally mention start date and end date during which delegates can be activated.

Now ready to use the Delegate Functionality.


2. Expense Report Policy

One can define policies that your workers must follow when entering and submitting expense reports and travel requisitions. Implementing expense policies can help one to manage expenses effectively.

Configuration

Step 1: Go to expense report


Step 2: Click New


Step 3: Create new expense policy for a selected organisation as per below setup


Step 4: Define policy rule


Step 5: Do the necessary setup as per business requirement as guided below 


Important Note: The expense policy is always checking the policy per line. When you define any expense policy (Hotel/Meal/Car Rental/Flight etc.) - system informs you the amount is taken from expense line:

In the current design there's no chance to summarize expense category from whole expense report and validate through policy. 

Step 6: Click OK and this expense policy will be created. Now, employee can use this expense policy to create expense report.


That's all for the blog


Thank You

Happy Learning Slight smile

Configuration of Expense Management to process Expense Report in D365 F&O Part 1

 Overview

The Expense management module in Microsoft Dynamics 365 Finance and Operations allows organizations to track and manage employee expenses. Below is the mandatory setup required to create and post expense report.

In this blog we will learn the basic and mandatory setup required to process the expense report.


Mandatory Setup:

1. Payment Method: Method of payment is to set first.

Note: e,g.  if company pays employees expenses to credit card company then one should choose offset account type as vendor and before that he has to create new vendor for that particular credit card company.


2. Shared Category or Category ID: Category ID will be created based on the expense type given in the global category form. And here usage of these expense type is to be selected (like this category ID is used for Project, Production or Expense.)

Moreover, Subcategories can also be created  here for the purpose of itemization.


3. Expense Category: Based on category ID expense category is created. Here ledger account for expense is added which will be debited after posting expense report. Method of Payment must be added and Itemization mandatory can be checked YES if required.


4. Workflow Setup: Create workflow for Expense Report as per business requirement.


5. Employee Mapping with User: Go to system admin > user > user and select particular user and select employee for that particular user 

Note: Employee is created in module Human Resource > Worker > Employee


6. Vendor Mapping with Employee: vendor mapping to employee is required since posted expense report transaction shows in that particular vendor transaction


7. Number Sequence: (Required while posting Expense report it will generate an invoice number based on the below number sequence setup)


Now, you are ready to create expense report (Expense Management > My Expense > Expense Reports)


Happy Learning!

Thank You Slight smile

How to Export and Import Workflow if the same version exists in another environment in D365 F&O

 Requirement

1. Customer need not to create same workflow again and again for different D365 environment. They want to copy the same workflow in different environment.

2. If there is any change in the workflow that has been done in UAT environment manually and same changes they need in Production environment also.

Problem Statement

You may receive error that (V41 already exist. Import has been cancelled) while importing the exported version 41 if there is already version 41 exist in the D365 environment where you are importing this.


Solution

Suppose we want to import Purchase Requisition Workflow:

Go to the procurement and Sourcing > Setup > Procurement and sourcing workflow and select purchase requisition review workflow then click on Versions.


Select the version that you wanted to import in another environment and click on export


Selected version of the workflow will be downloaded in your computer


Now, Let's Import the Exported version of the workflow in another environment

Go to the procurement and Sourcing > Setup > Procurement and sourcing workflow and select purchase requisition review workflow then click on Versions then click on Import:


Now, browse the exported file of version 41.27.2.0 and Upload then click OK 


Here, Important Point to note, you may receive error while importing the above exported version 41.27.2.0 if there is already version 41 exist in the D365 environment where you are importing this.


Let's Rectify the issue:

Go to your downloaded workflow version and right click and EDIT

In my case it is opened in the Notepad, you need to look for VersionIDMajor which will be 41, you need to change this to higher version which does not exist in you D365 environment. We change it to 42 and SAVE this. 


And then try to Import the same it will be imported with major version 42. If you want to activate version 42 just click on Mark Active.

And here we go with newly imported workflow...


Happy learning!

Thank you Slight smile

Featured post

Vendor Aging Report with Large Data Volume in Microsoft D365 F&SC

 Introduction There is a thrilling announcement that Microsoft has launched a new functionality for Vendor Aging reports having large data v...